...About 2 min
3 Steps to Build Your Own ChatGPT Web
ChatGPT (full name: Chat Generative Pre-trained Transformer) is a chatbot program developed by OpenAI and was released on November 30, 2022.
ChatGPT is an AI-powered natural language processing tool. It engages in conversations by understanding and learning human language. It can interact based on the context of the conversation, simulating human-like chat interactions. It can even complete tasks such as writing emails, video scripts, copywriting, translation, coding, paper writing, and more.
ChatGPT-Web
- Supports dual models and provides two unofficial
ChatGPT APImethods.
Introduction
| Method | Free? | Reliability | Quality |
|---|---|---|---|
ChatGPTAPI(gpt-3.5-turbo-0301) | No | Reliable | Relatively simple |
ChatGPTUnofficialProxyAPI(Web AccessToken) | Yes | Relatively unreliable | Smart |
- Comparison:
- ChatGPTAPI(gpt-3.5-turbo-0301) uses gpt-3.5-turbo-0301 to simulate ChatGPT through the official OpenAI API (the most robust method but not free and does not use models fine-tuned for chat).
- ChatGPTUnofficialProxyAPI accesses ChatGPT's backend API through an unofficial proxy server, bypassing Cloudflare (uses the actual ChatGPT, lightweight, but depends on a third-party server, and has rate limitations).
- Thanks to the original author Chanzhaoyu for his hard work
Building Steps
Step One: Install Docker and Docker-compose
- Install Docker
# Update and install necessary software

apt-get update && apt-get install -y wget nano

# Install Docker

curl -sSL https://get.docker.com/ | sh

# Start Docker automatically

systemctl start docker

systemctl enable docker
- Install Docker-compose
sudo curl -L "https://github.com/docker/compose/releases/download/v2.17.3/docker-compose-$(uname -s)-$(uname -m)" -o /usr/local/bin/docker-compose
sudo chmod +x /usr/local/bin/docker-compose
Step Two: Install ChatGPT-Web
- Create a directory
mkdir -p /data/docker_data/chatgpt
cd /data/docker_data/chatgpt
- Create a docker-compose.yml file
nano docker-compose.yml
- Enter the following content in the file, then save with Ctrl+X and exit with Y
version: '3'

services:
  app:
    image: luvsia/chatgpt-web # Always use latest; pull this tag image again when updating
    ports:
      - 3002:3002
    environment:
      # Choose one of the following
      OPENAI_API_KEY:
      # Choose one of the following
      OPENAI_ACCESS_TOKEN:
      # Optional API interface address; can be used when OPENAI_API_KEY is set
      OPENAI_API_BASE_URL:
      # Optional API model; can be used when OPENAI_API_KEY is set
      OPENAI_API_MODEL:
      # Optional reverse proxy
      API_REVERSE_PROXY:
      # Optional access secret key
      AUTH_SECRET_KEY:
      # Optional timeout in milliseconds
      TIMEOUT_MS: 100000
      # Optional Socks proxy, effective when used with SOCKS_PROXY_PORT
      SOCKS_PROXY_HOST:
      # Optional Socks proxy port, effective when used with SOCKS_PROXY_HOST
      SOCKS_PROXY_PORT:
- After creating, run
docker-compose up -d
- Now you can access ChatGPT through IP:3002
Step Three: Reverse Proxy ChatGPT and Enable Typewriter Effect
- In the Baota panel, create a website chat.example.com, register a certificate, and enable HTTPS

- Reverse proxy
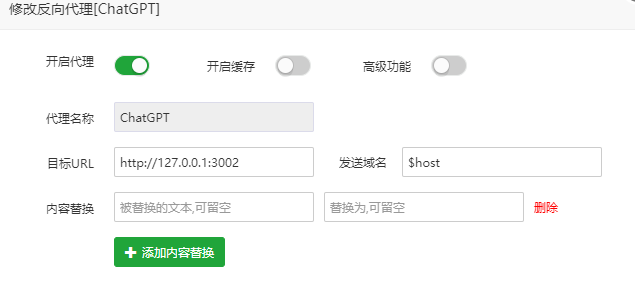
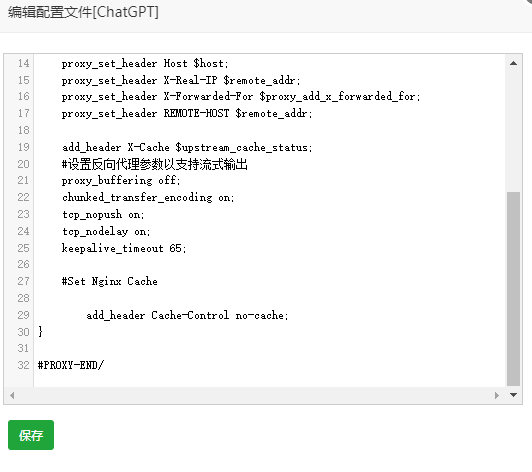
- Modify the reverse proxy configuration file to enable the typewriter effect
# Set reverse proxy parameters to support streaming output
proxy_buffering off;
chunked_transfer_encoding on;
tcp_nopush on;
tcp_nodelay on;
keepalive_timeout 65;
Mission accomplished, Enjoy
Powered by Waline v2.15.8